Security engineering
Secure Automated Purge: Building a Bootable Disk-Sanitization Utility
A bootable disk-sanitization prototype that requires device-specific validation and review against NIST SP 800-88 Rev.2 before operational use.
Point-in-time review · 12 July 2026. This 2025 article documents a prototype and its design intent, not a validated sanitization product or compliance certification. NIST SP 800-88 Rev.1 was superseded by Rev.2. Before operational use, review each method against Rev.2, validate it on the exact device and firmware, independently verify the result, and obtain authorization under your organization’s policy.
This is Part 2 of my Secure Data Erasure Tools series. Part 1: Introducing the BitLocker Cryptographic Erase Utility: Secure Data Destruction Made Simple
How I evolved from a BitLocker-specific solution to creating a universal disk sanitization tool that automatically detects and attempts device-specific sanitization commands across detected internal drives
The Problem: Secure Data Destruction at Scale
Last month, I was tasked to arrange a solution prototyping a repeatable workstation-sanitization workflow informed by NIST SP 800-88 Rev.1 before disposal. The options were:
- Manual commands: Boot each system with Linux, run different commands for different drive types. Time-consuming and error prone.
- Surface Data Eraser limited for Microsoft Surface machines, and Lenovo ThinkShield Secure Wipe limited for Lenovo new Gen. machines.
- Enterprise tools: Expensive licenses, often require network infrastructure.
- Physical destruction: Wasteful when drives could be reused.
Initially, I tackled this by creating a PowerShell-based BitLocker Cryptographic Erase tool. It worked brilliantly for Windows systems with BitLocker enabled, providing a fast cryptographic-erase path for supported BitLocker systems. But I quickly realized its limitations which one of them it has only worked on Windows machines with BitLocker On.
This led me to think bigger. What I really needed was a universal tool that would:
- Boot from USB and run automatically
- Detect all drive types (NVMe, SATA SSD, HDD)
- Select a device-specific command path for each detected drive
- Map the selected methods to the Purge concepts described in the then-current NIST SP 800-88 Rev.1
- Provide audit logs for compliance documentation
- Be completely free and open source
So, I built one.
Introducing Secure Automated Purge USB
The Secure Automated Purge USB Utility is a bootable Linux ISO that automates device-specific sanitization commands from a bootable Linux environment. Just boot from USB, confirm the operation, and walk away. When you come back, the attempted device commands have finished and the system has shut down; the result still requires independent verification.
GitHub: github.com/CyberKareem/SecureAutomatedPurge-USB opens in a new tab
Main Features
- Fully Automated: Automated prompts are provided, but destructive use still requires trained supervision
- Standards-aware prototype: Methods selected from the then-current Rev.1 guidance; current, device-specific validation is required
- Multi-Drive Support: NVMe, SATA SSD, and HDD
- Drive-Type Routing: Selects a command path by detected drive type; suitability requires validation
- Audit Logs: Detailed logs for compliance documentation
- Safety Controls Implemented: Requires explicit confirmation, excludes USB drives
The Evolution: From BitLocker to Universal Purge
This project actually started with my BitLocker Cryptographic Erase opens in a new tab tool. That PowerShell utility uses BitLocker’s encryption to achieve a fast cryptographic-erase path on supported BitLocker systems. It’s incredibly fast.
But real-world IT is messy. In 50 workstations, for example:
- 30 had BitLocker enabled (the BitLocker tool was observed to complete its command path)
- 10 were Linux workstations
- 5 had corrupted Windows installations
- 5 had BitLocker disabled
This led to an important realization: I needed both tools in my arsenal.
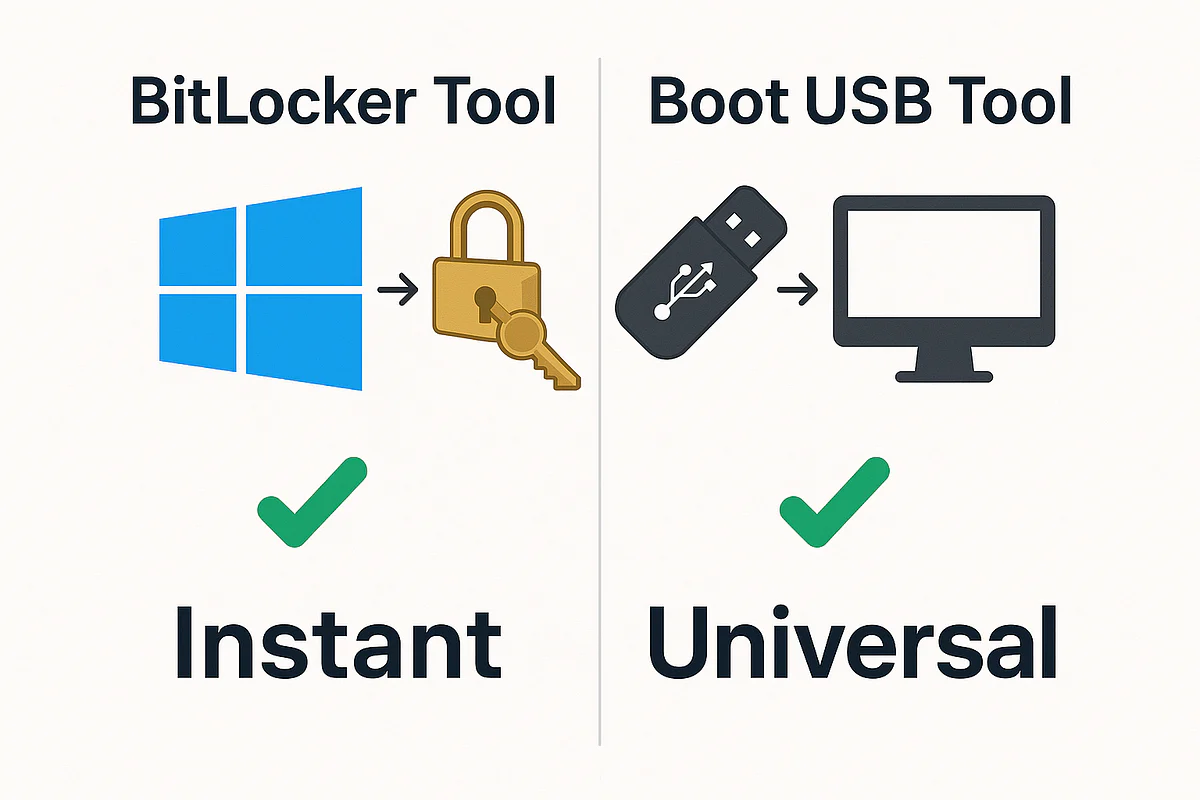
Windows with BitLocker enabled
Best Tool: BitLocker Crypto Erase
Why: Instant and can be performed remotely
Corrupted or non-booting OS
Best Tool: Secure Automated Purge
Why: Doesn’t require a functioning operating system
Linux or Unix systems
Best Tool: Secure Automated Purge
Why: BitLocker is not available on these platforms
Mixed environment (Windows + Linux)
Best Tool: Secure Automated Purge
Why: A universal solution for all OS types
Remote management needed
Best Tool: BitLocker Crypto Erase
Why: Can be triggered via PowerShell remoting
Unknown drive encryption status
Best Tool: Secure Automated Purge
Why: Does not depend on BitLocker state; device behavior still requires validation
And both tools were designed around NIST SP 800-88 Rev.1 concepts; that design intent is not independent verification, they just approach it differently:
- BitLocker tool: Uses existing encryption for cryptographic erase
- This tool: Uses drive controller commands or overwriting
Together, they explore several common device scenarios; they do not establish complete sanitization coverage.
Starting with a specialized tool (BitLocker) taught me the value of cryptographic erasure. But real-world complexity demanded a universal solution. Sometimes the best toolkit isn’t one perfect tool, but multiple tools that excel in different scenarios.
The Technical Challenge
Creating this tool involved solving several interesting technical challenges:
1. Automatic Drive Detection and Classification
The script needs to differentiate between:
- NVMe SSDs (require
nvme-clitools) - SATA SSDs (support ATA Secure Erase)
- Traditional HDDs (require overwriting)
- USB drives (must be excluded for safety)
Here’s how I implemented it:
identify_drive_type() { local drive=$1 local drive_name=$(basename "$drive") # Check if USB if [[ $(readlink -f /sys/block/"$drive_name") =~ usb ]]; then echo "usb" # Check if NVMe elif [[ "$drive" =~ nvme ]]; then echo "nvme" # Check if SSD elif [[ $(cat /sys/block/"$drive_name"/queue/rotational 2>/dev/null) == "0" ]]; then echo "ssd" else echo "hdd" fi}2. Sanitization Methods Implemented in the Prototype
NIST SP 800-88 Rev. 1 defines different sanitization levels. the prototype attempted to implement methods it mapped to the Rev.1 “Purge” category:
For NVMe Drives: Cryptographic Erase
nvme format "$drive" --ses=2nvme format "$drive" --ses=1nvme sanitize "$drive" --sanact=2This asks a supporting drive controller to perform cryptographic erase. The actual result depends on the controller, firmware, command support, and independent verification.
And it will fall back to block erase using NVMe format command, and it will also use the crypto erase sanitize command as the last resort, attempting an alternate controller command path.
For SATA SSDs: ATA Secure Erase
hdparm --user-master u --security-set-pass p "$drive"hdparm --user-master u --security-erase p "$drive"hdparm --sanitize-crypto-scramble "$drive"hdparm --sanitize-block-erase "$drive"This triggers the drive’s built-in secure erase function which is the most compatible, and the controller executes internally. Then tries the newer sanitize commands, as alternate controller command paths.
For HDDs: 3-Pass Overwrite
shred -v -n 3 "$drive"This overwrites the entire drive three times: random data, random data, zeros.
3. Building a Bootable Environment
I used Debian 12 netinst Live Build opens in a new tab to create a minimal Linux environment that:
- Boots entirely into RAM (no persistence)
- Includes only necessary tools (
nvme-cli,hdparm,shred) - Automatically starts the purge script
- Has no network connectivity (security feature)
The key was configuring rc.local to launch immediately after boot:
#!/bin/shexec < /dev/console > /dev/console 2>&1clear/usr/local/bin/secure_purge.shexit 04. Safety Mechanisms
Because the tool is destructive, The tool includes multiple safety features:
- USB drives excluded: Prevents accidentally wiping the boot drive
- Explicit confirmation: Must type (all caps)
ERASE ALL DATAto proceed - Detailed drive listing: Shows model and serial numbers
- No network access: Prevents remote triggering
- Auto-shutdown: Ensures clean completion
Limited Test Demonstration
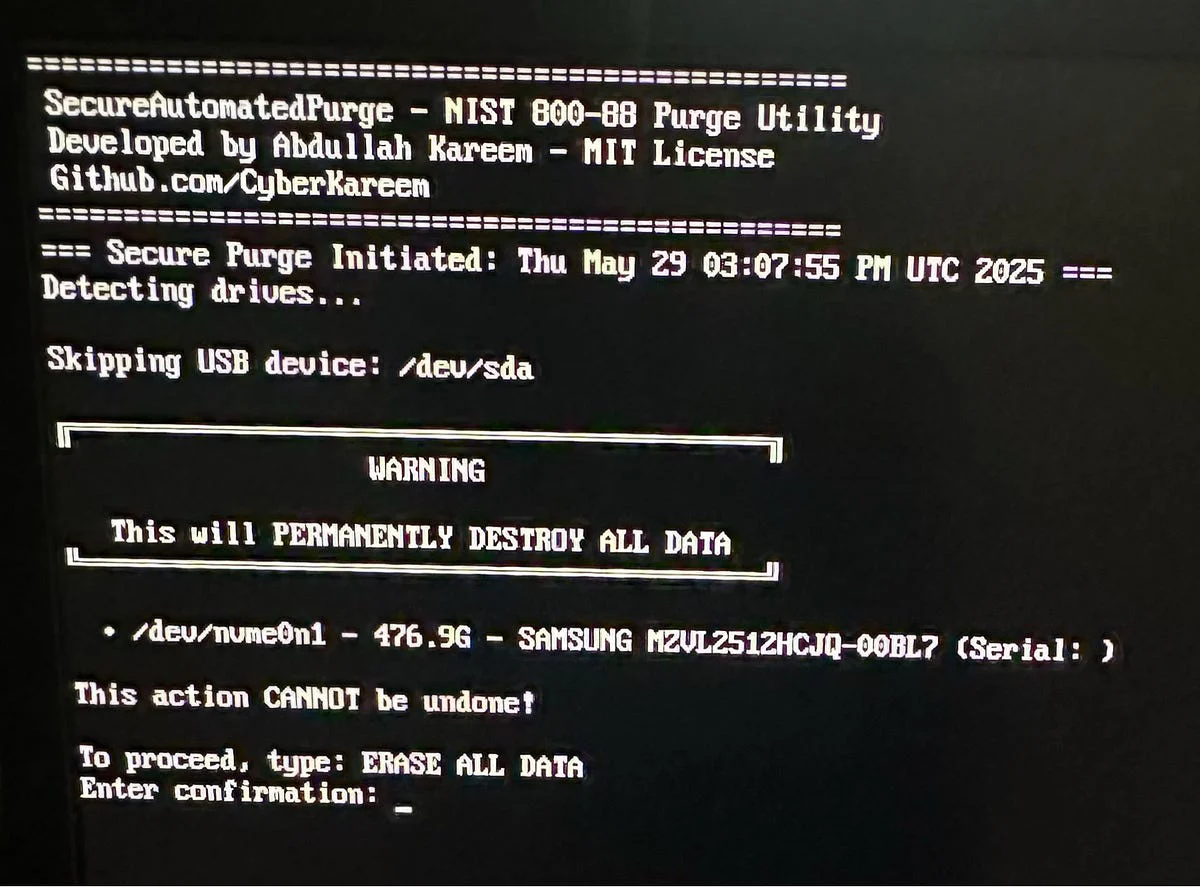
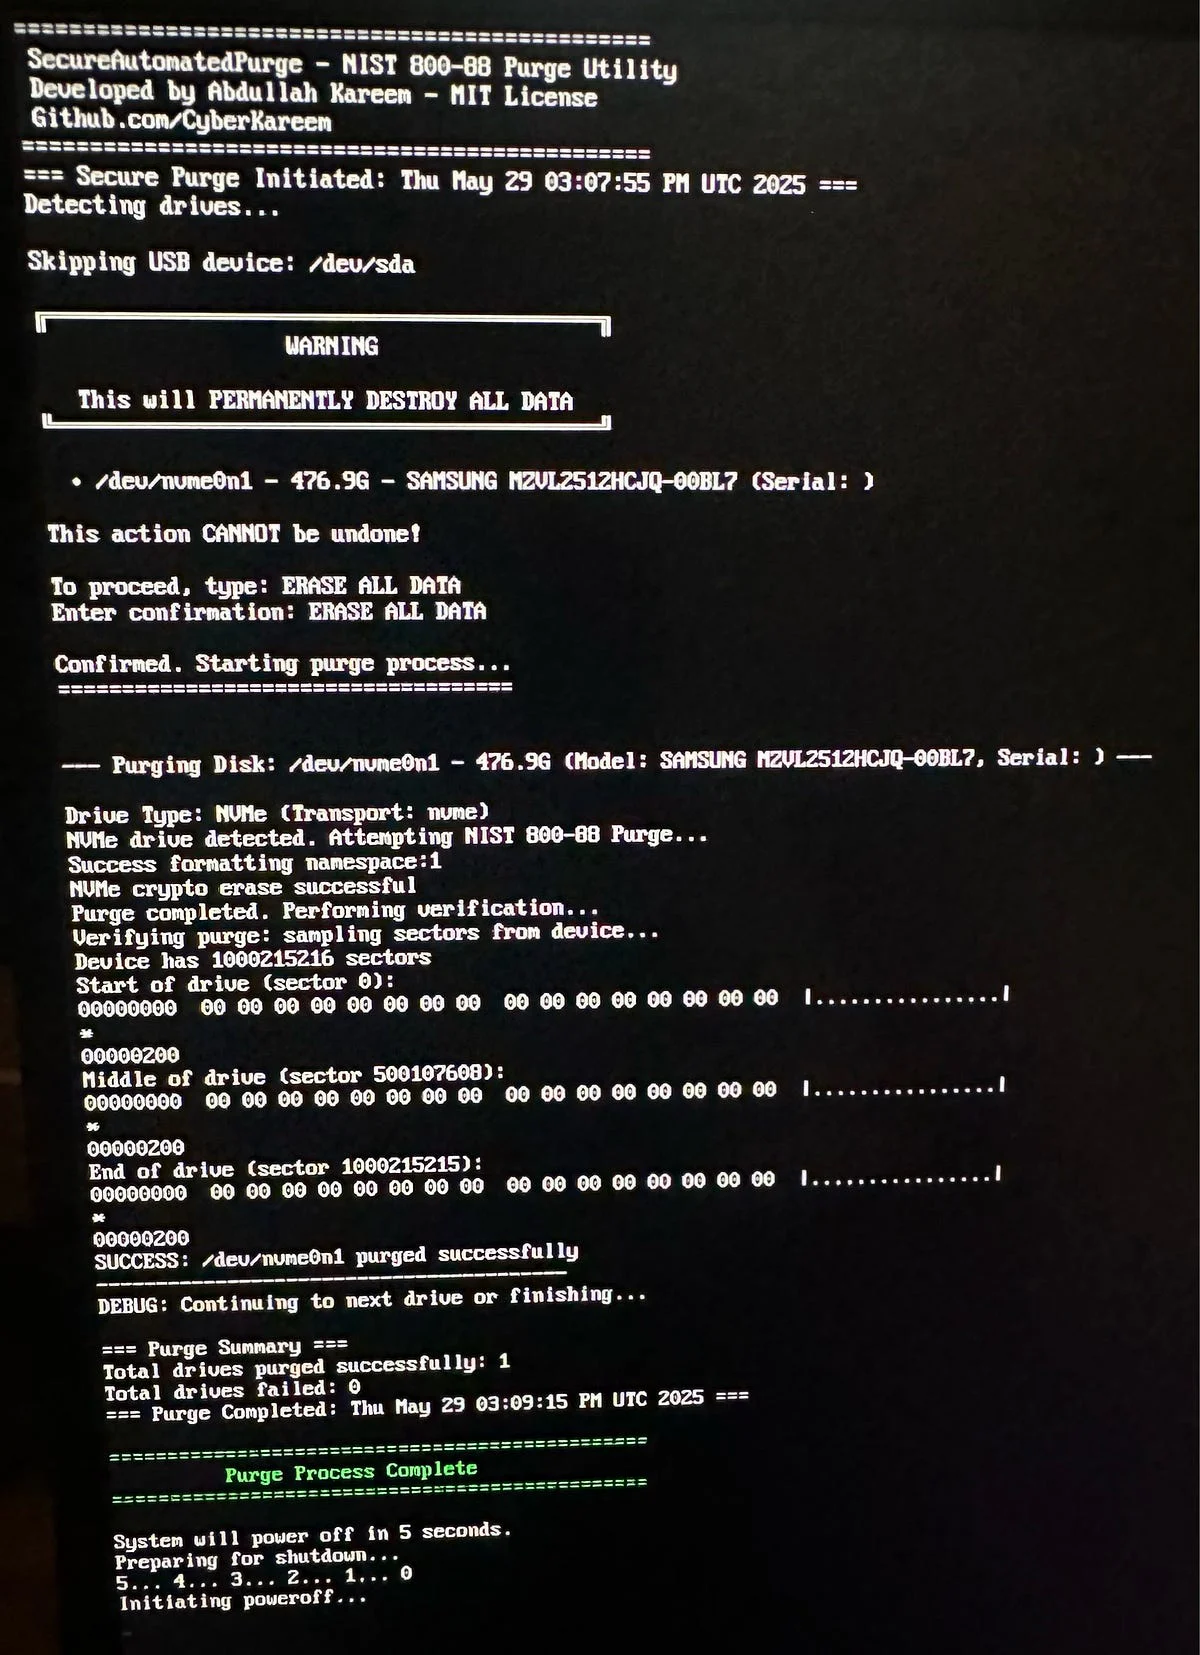
Here’s what it looks like in action:
NVMe System
SATA SSD System
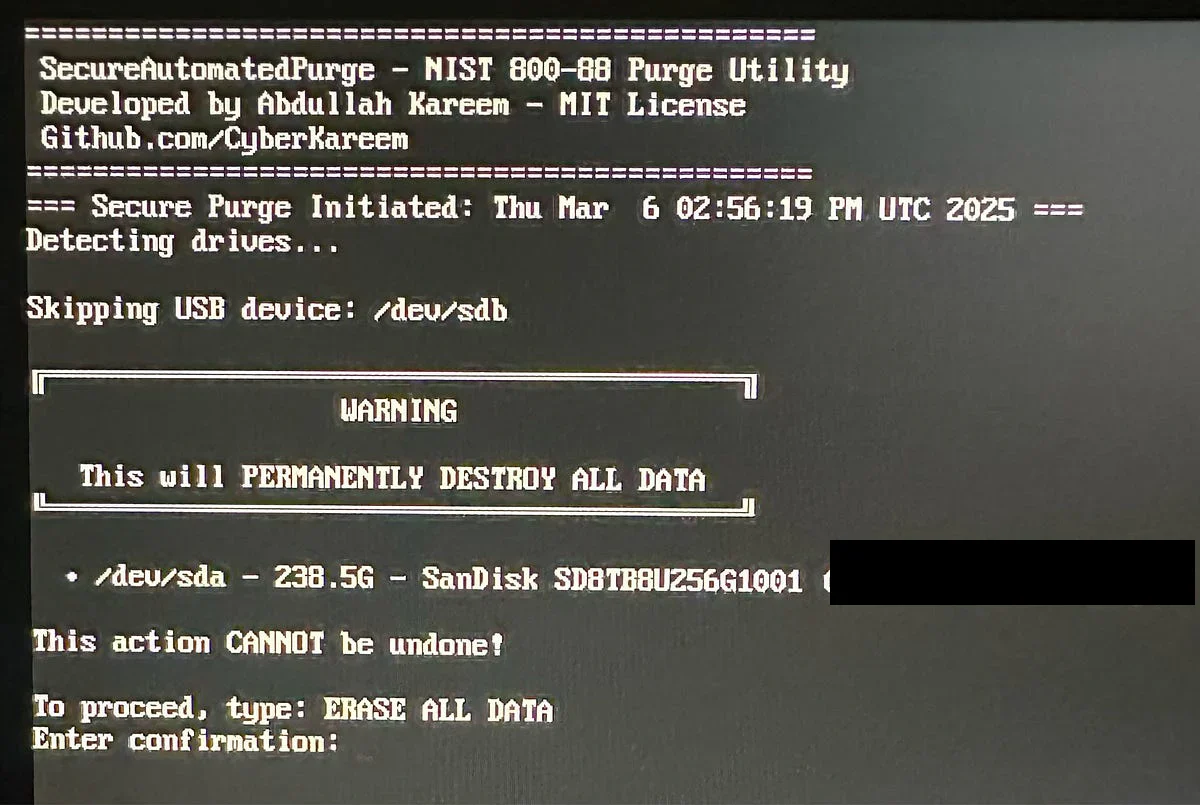
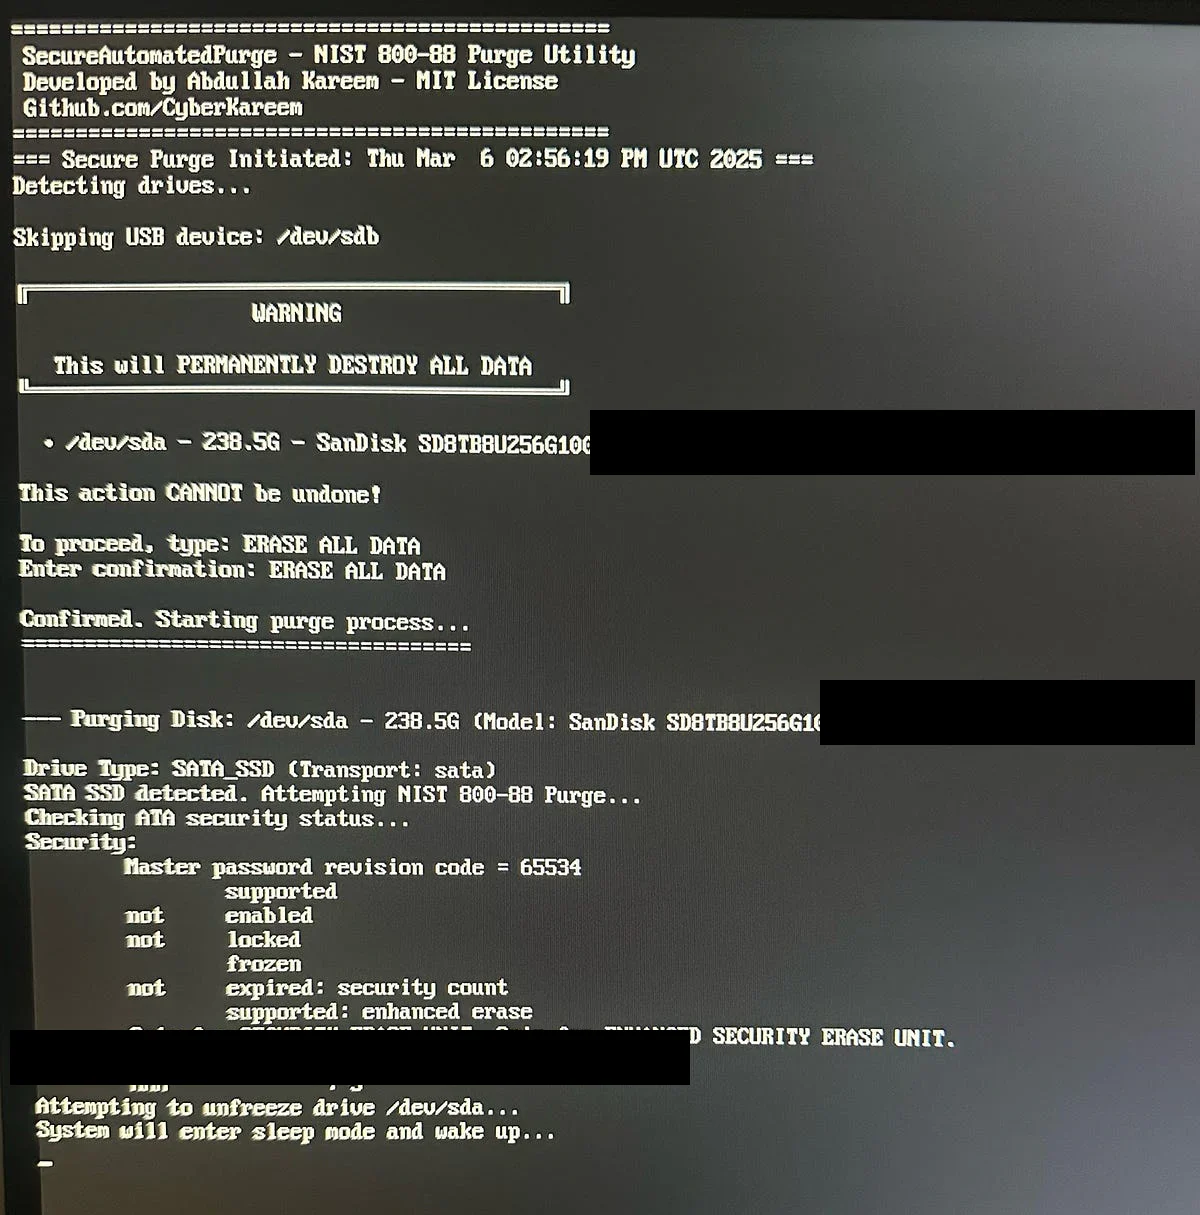
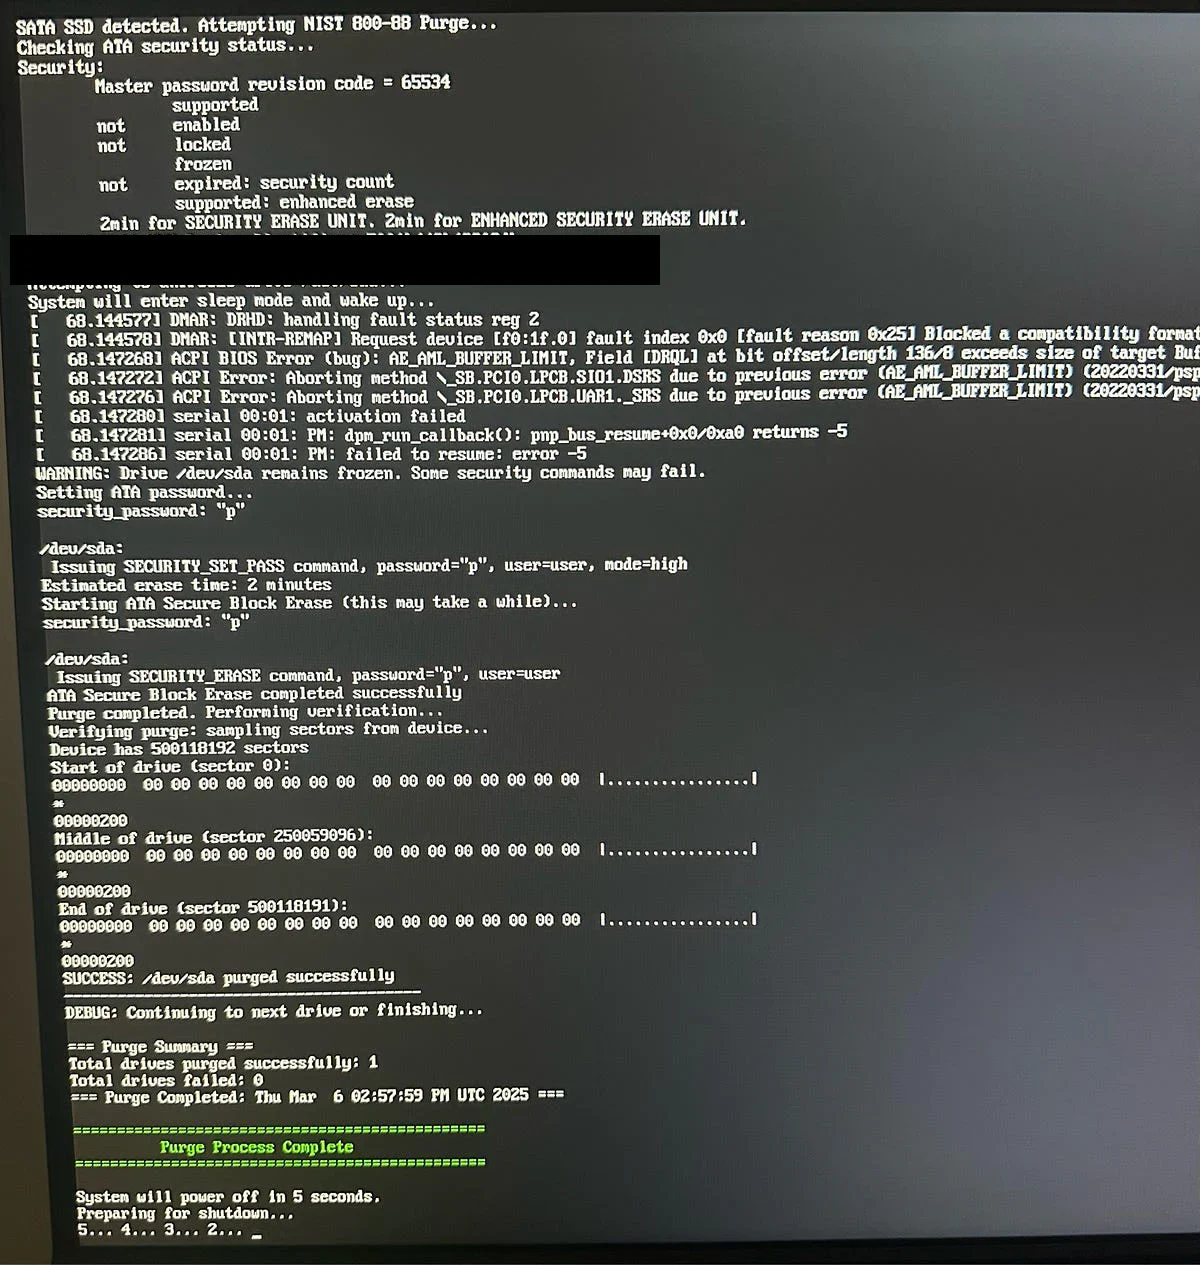
HDD System
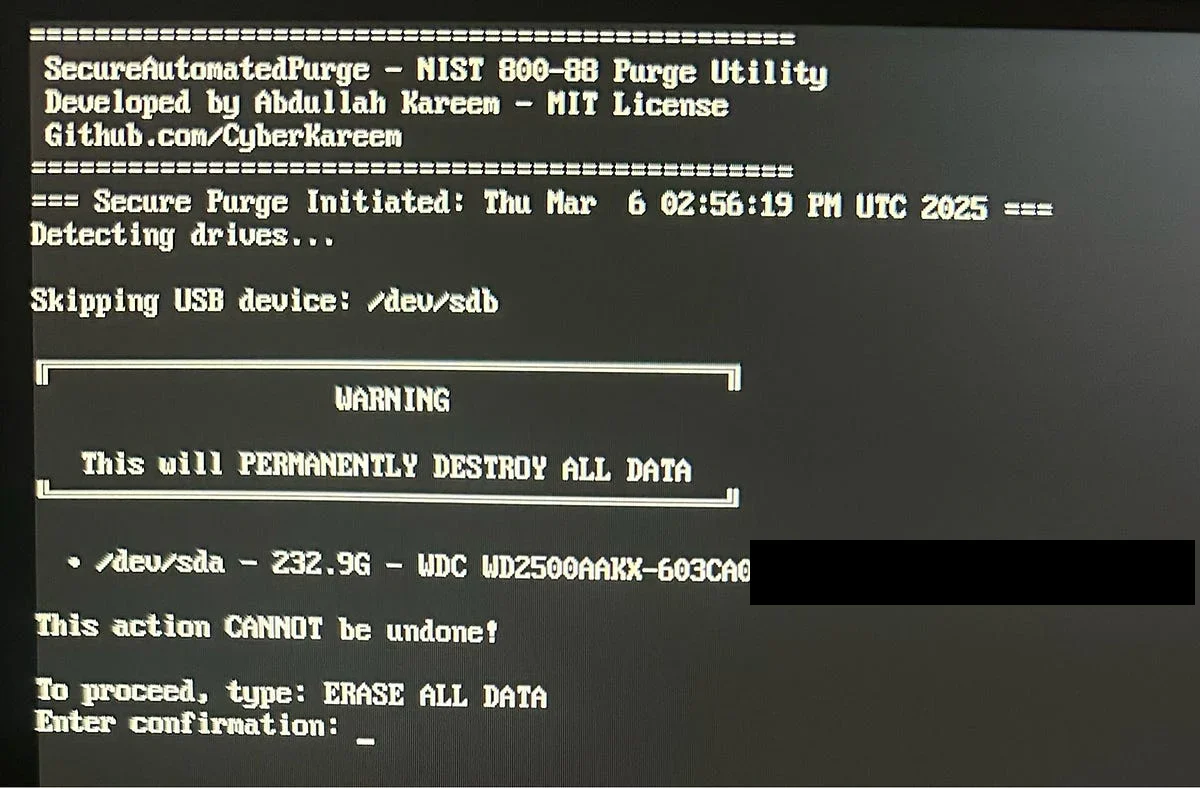
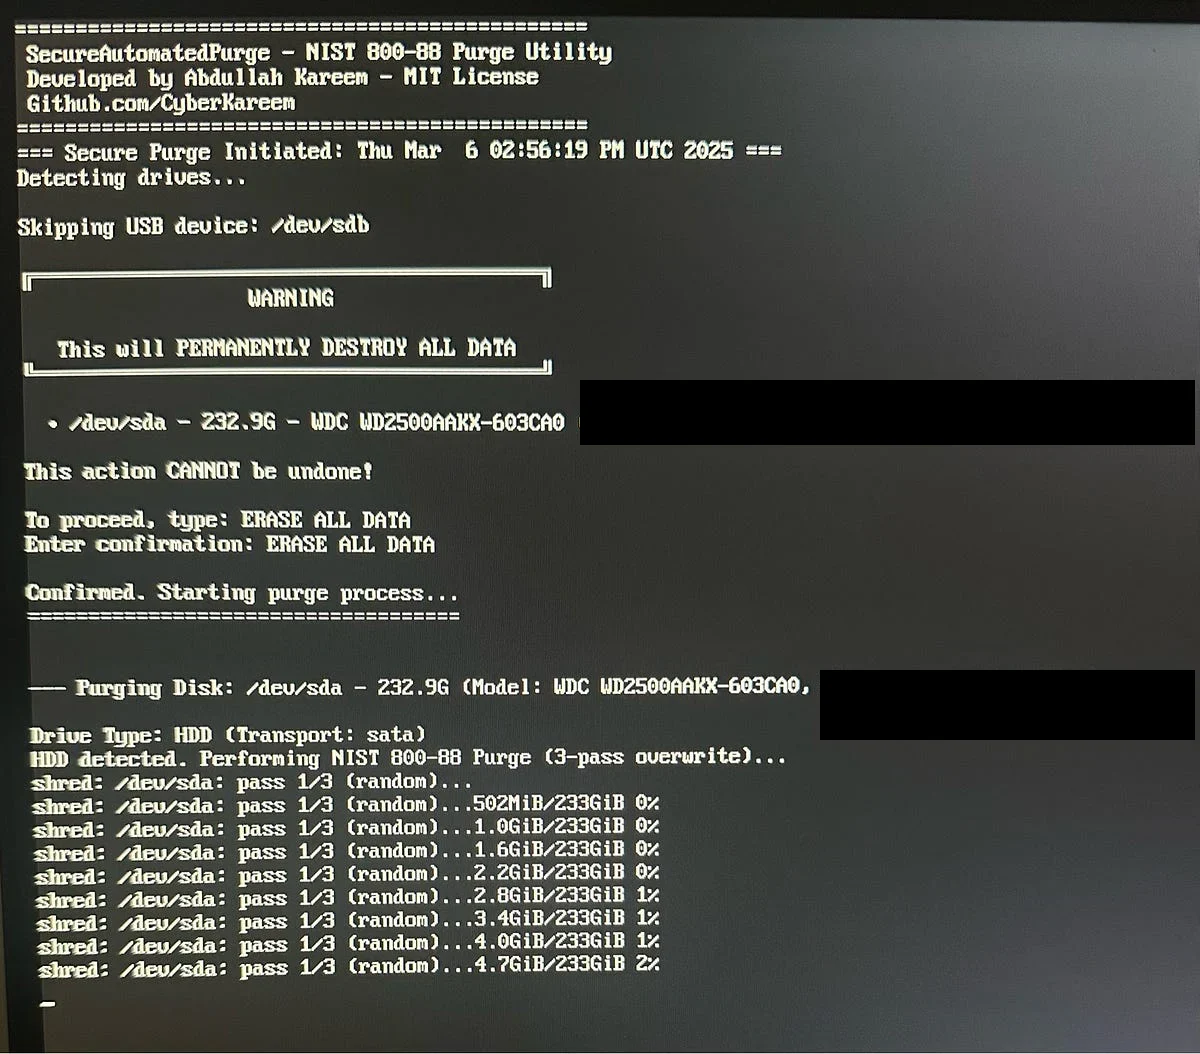
After countless hours coding, testing, debugging, and refining, seeing the demonstrated commands complete on the limited HDD, NVMe, and SATA SSD test hardware was encouraging. It’s not just code, it’s trust, reliability, and a bit of my stubbornness combined. Moments like these remind me why I chose cybersecurity in the first place.
Lessons Learned
1. Drive Controllers Are Smart
Modern drives have sophisticated controllers that can perform secure erasure far faster than any software-based overwriting. Using these built-in capabilities is key to efficient sanitization.
2. One Size Doesn’t Fit All
Different drive types require different approaches. NVMe drives support cryptographic erase, SATA drives have ATA Secure Erase, and only HDDs require actual overwriting.
3. Automation Reduces Errors
By automating the entire process, we eliminate the risk of human error, wrong commands, skipped drives, or incomplete erasure.
4. Compliance Requires Documentation
The tool generates detailed logs showing:
- Drive serial numbers
- Erasure methods used
- Completion timestamps
- Verification results
Building Your Own
A v1.0.0 ISO release is available on GitHub for controlled lab inspection; do not use it on operational media without a current source review and hardware validation: SecureAutomatedPurge USB utility opens in a new tab
The tool is completely open source. To build your own ISO:
# Clone the repositorygit clone https://github.com/CyberKareem/SecureAutomatedPurge-USB.gitcd SecureAutomatedPurge-USB# Run the build script (Debian/Ubuntu)sudo ./build/build_iso.shThe build process:
- Creates a Debian Live environment
- Installs required packages
- Adds the purge script
- Configures auto-start
- Generates a bootable ISO
Security Considerations
What It Protects Against
- Data recovery software
- Filesystem undelete tools
- Forensic recovery methods
- Casual data thieves
What It Doesn’t Protect Against
- Nation-state level forensics
- Electron microscopy on HDDs
- Hidden drive areas (HPA/DCO)
- Damaged sectors that can’t be overwritten
For high-sensitivity or regulated media, follow the organization’s approved sanitization or destruction policy.
Use Cases
IT Asset Disposal
Intended for controlled evaluation of corporate-workstation decommissioning workflows. Boot, confirm, and move to the next machine while the first one wipes.
Personal Privacy
Selling your old computer? Reuse or disposal still requires a verified result under an approved procedure.
Compliance Requirements
Many regulations (HIPAA, GDPR, PCI-DSS) require secure data disposal. The prototype attempts sanitization commands and produces logs; neither the command result nor the logs alone establish regulatory compliance.
Donation Programs
Refurbishing computers for charity? Ensure previous data is completely removed first.
Possible next steps
I’m thinking of adding:
- Network boot support (PXE)
- Parallel drive processing
- Cloud logging for centralized reporting
- GUI version for less technical users
- Support for external drives (with safety controls)
What I learned
The work produced two experimental media-sanitization paths: a BitLocker workflow for supported Windows systems and a bootable Linux prototype for other device types.
- BitLocker Crypto Erase: The power of using existing encryption
- Secure Automated Purge: The importance of universal solutions
Together, they document two experimental approaches to media sanitization. The BitLocker tool handles the “easy” cases where Windows and encryption are already in place. This bootable prototype explores non-BitLocker device paths.
The combination of modern drive capabilities and NIST guidelines allowed me to create something that’s fast in the limited hardware tests documented here. In one limited test, a controller command completed on a 500GB NVMe drive in about five seconds; that timing is not proof of successful sanitization.
If you’re responsible for secure data disposal, I encourage you to:
- Try both tools: review both source trees and validate only the relevant path in an isolated lab
- Read NIST SP 800-88: Understand the standards behind the tools
- Contribute: Both projects are open source and welcome improvements
- Stay secure: Make data sanitization part of your standard procedures
Resources
My Secure Erasure Tools
- Secure Automated Purge USB: GitHub opens in a new tab | Download ISO opens in a new tab
- BitLocker Crypto Erase: GitHub opens in a new tab | Blog Post
Standards & References
- NIST SP 800-88 Rev. 1: Guidelines for Media Sanitization opens in a new tab
Related Reading:
- Shred opens in a new tab
- NVMe-cli opens in a new tab
- Advanced: Erasing SATA Drives by using the Linux hdparm Utility opens in a new tab